How to Make an Easy and Inexpensive Post-Mastectomy Swimsuit
I am a two-time breast cancer survivor. The second time, I had a total mastectomy. I hope to help others by sharing my experience and ideas.
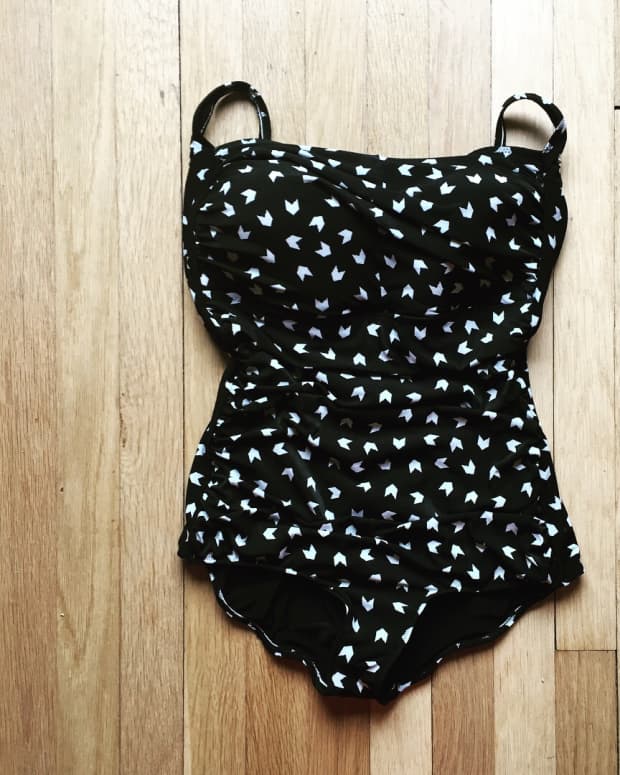
Sun Bathing in Style Post-Mastectomy
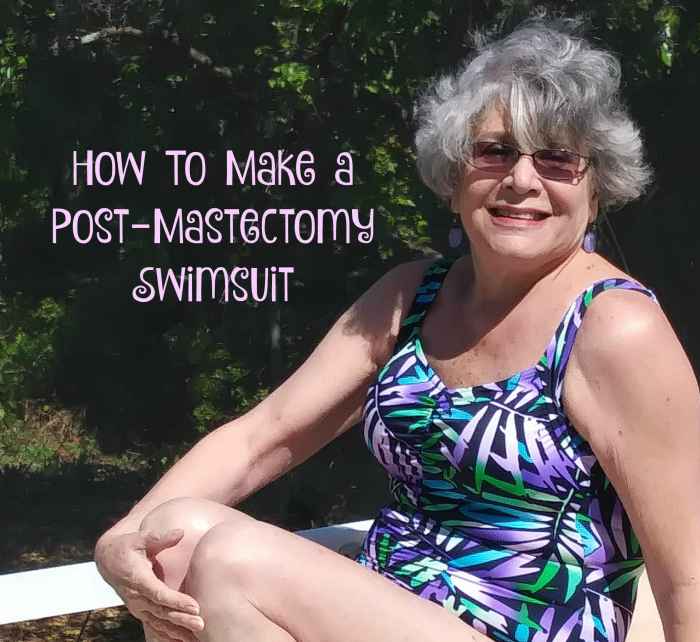
The author poses in her post-mastectomy swimsuit. She modified a swimsuit she already owned.
Catherine Giordano
The Post-Mastectomy Swimwear Problem
I was scheduled to go on a cruise about six weeks after my mastectomy, and I was determined not to cancel the plans I had made six months prior to my diagnosis. The problem was finding a swimsuit and breast forms to use with it.
Medicare had paid for my post-mastectomy prosthesis items (special bras and breast forms to insert inside the “pockets” built into the cups of these bras). However, the breast forms made for the prosthetic bras cannot be used in the water. And since Medicare does not pay for swimwear solutions, cost was going to be a major consideration.
I looked online for solutions. I found mastectomy swimsuits that looked very stylish. They differ from regular swimsuits in that they have a pocket so a breast form can be inserted. I found nice ones for around $100. I also found inserts made for the swimwear. The best ones were made of a silicone gel. They were very expensive, at about $100 to $150 each, and I needed two. (I did find some cheaper options, but I didn’t think they would look good or work out well.)
I don’t do much swimming these days so it didn’t make sense for me to spend $300 for something I would only use a few times a year. Plus, I had some brand new swimsuits sitting in my drawer that I had bought in anticipation of the cruise. I was determined to use those swimsuits. I looked online for a solution, but I didn’t find anything that was both cheap and easy. It was time to get creative.
I Found an Easy, Low-Cost, and Natural-Looking Solution
I found a creative solution that used the swimsuits I already had. The other materials I needed I already had on hand or they could be bought inexpensively. You can make this post-mastectomy swimsuit in 1 to 2 hours.
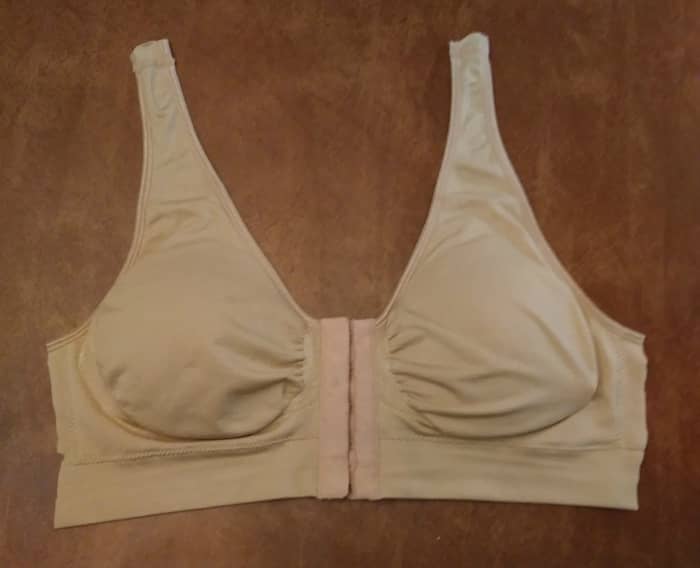
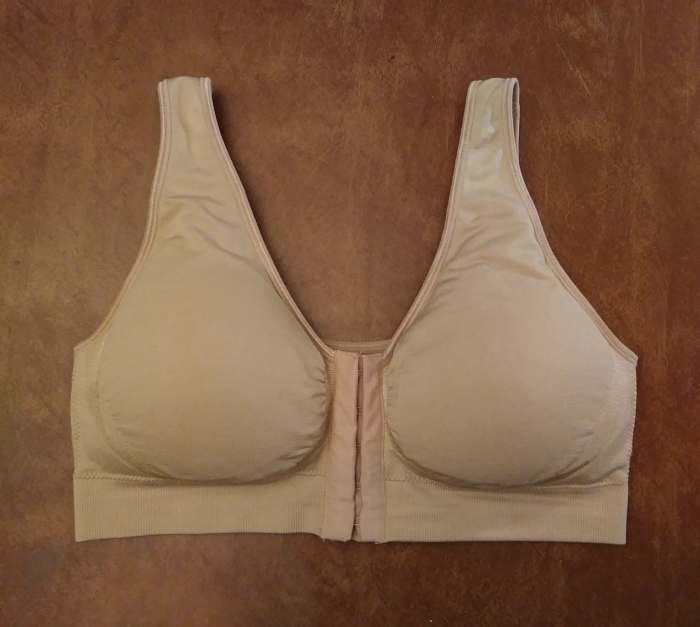
My solution was to sew a “Miracle Bamboo Comfort Bra” into my swimsuit. This is a bra made of a lightweight stretchy fabric with an elastic band (No underwires.) It has a pocket on the underside of the cup and a thin foam “shaper” that fits inside the pocket.
I already owned a couple of these. I used to wear them around the house or whenever comfort was more important than looks. If you don’t already own one of these, the good news is that they are very inexpensive. I bought mine in Bed and Bath and Beyond for $15.00. (Actually, only $12 because I had a 20% off coupon.) They are also available on Amazon.
If you buy one, buy the size you wore before your mastectomy. If you are buying a new swimsuit, buy the size that matches the swimsuit.
Tips for Selecting Other Bras With Similar Features
You may find other comfort bras, but I think this one is best because it has a front closure. This keeps the cups separate and at the correct distance from each other. If you already own a different brand of comfort bra, make sure it is made of stretchy fabric, has pockets in the cups, has thin foam inserts for shaping, and has a center area to keep the cups separate.
Finding Material to Stuff the Cups
The next problem was how to stuff the cups to get a natural look that would keep looking natural even when wet. I wandered around WalMart looking for a solution. When I spied a bin of nylon mesh shower balls, I knew I had the solution, a very cheap solution. They were only $2.00 each. I have also seen these in Bed Bath and Beyond in a pack of three for $6.00. Amazon also sells these shower balls for about $8.00 for four.
Directions for Making Your Post-Mastectomy Swimsuit
If you have ever hemmed a skirt, you can make this swimsuit adaption. All the stitching is on the inside so you don’t even have to worry about making neat perfect stitches. (Try your best anyhow.)
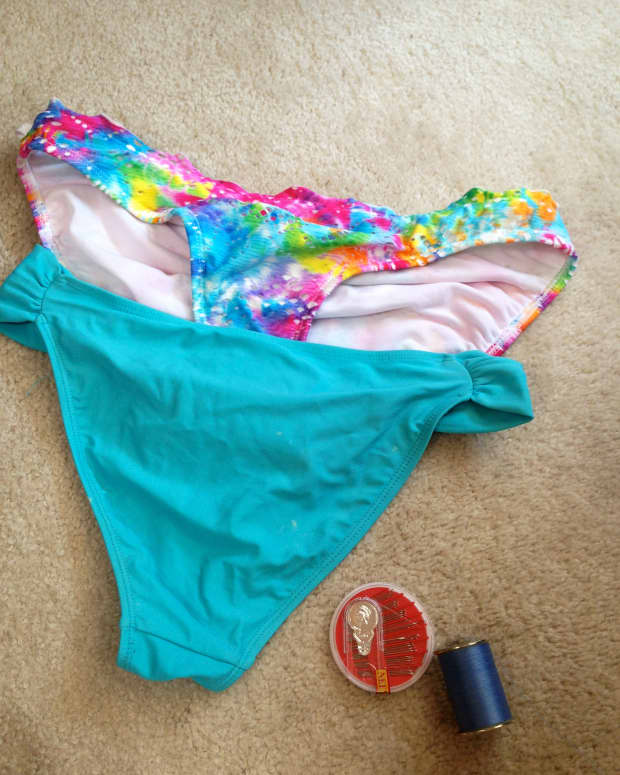
Supplies
- Comfort bra or similar
- Swimsuit of choice
- 2 luffas (loofa) or shower balls
- Pincushion and pins
- Scissors
- Thread and needle
Tips for Success
- I find it useful to pin things together before I sew them together.
- Also if you are not confident about the placement of the comfort bra, sew it with a long basting stitch using thread of a contrasting color. You can later sew everything with a matching color and remove the basting stitch.
Begin by getting everything ready, all the materials and the swimsuit you intend to modify.
The Tools and Materials You Will Need
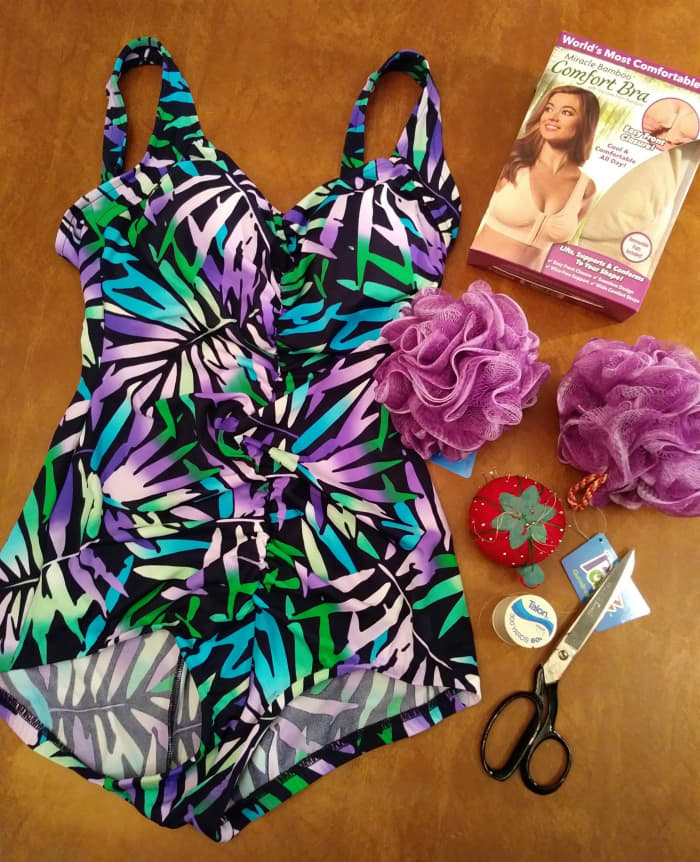
Get all of the materials you will be using ready
Catherine Giorddano
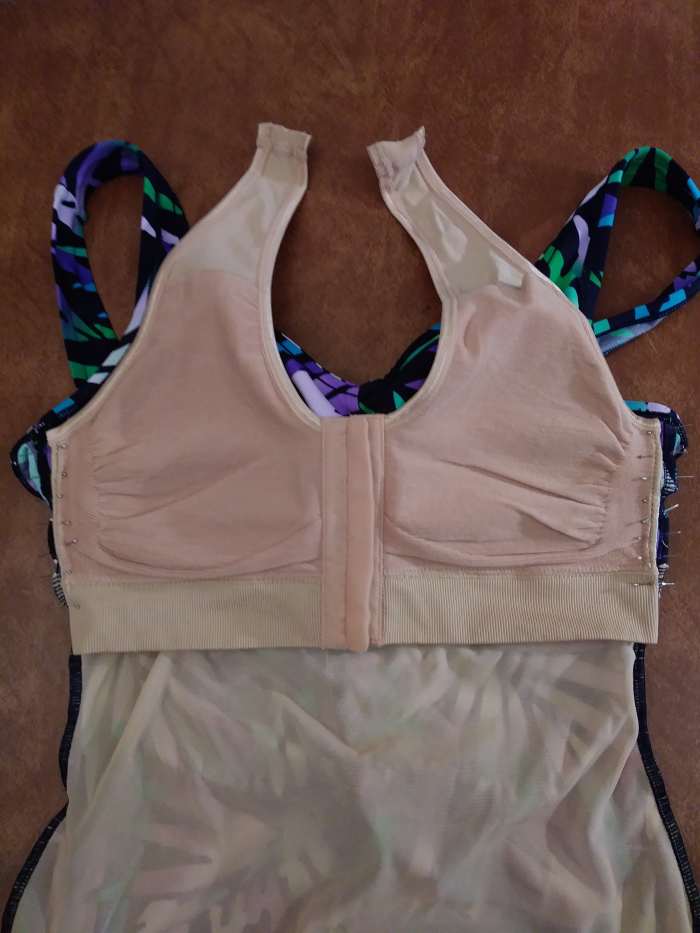
1. Cut the Comfort Bra
First cut the comfort bra just outside the side seam leaving about a half inch of the back attached. Cut the straps just above the seam.at the top of each strap. (You’ll trim the straps later). Don’t worry if the cuts are not straight. The excess material at the side will be turned under along the line of the seam.
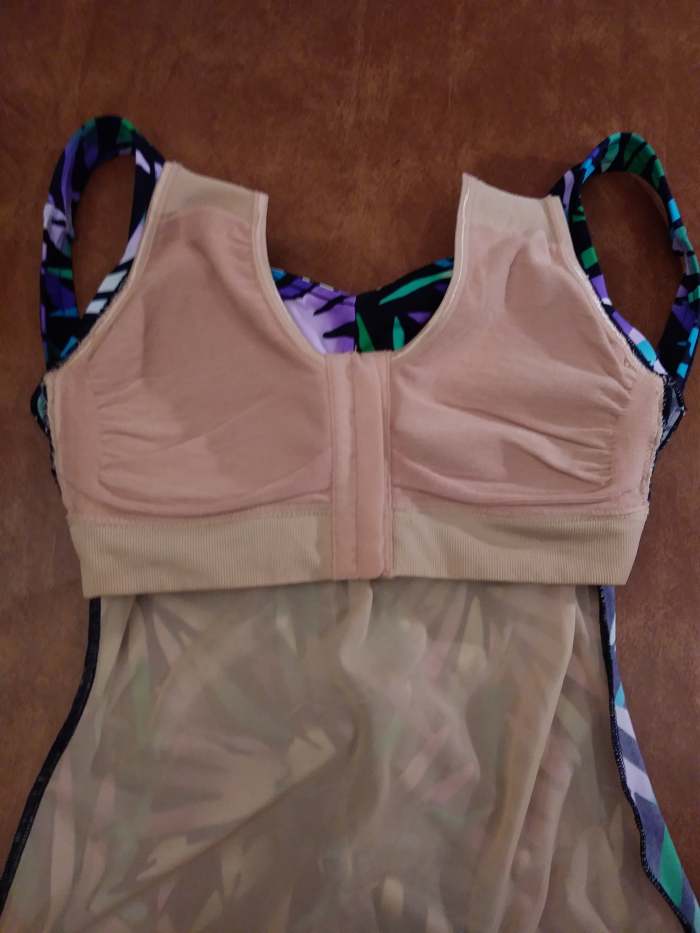
Remove the back of the comfort bra.
Catherine Giordano
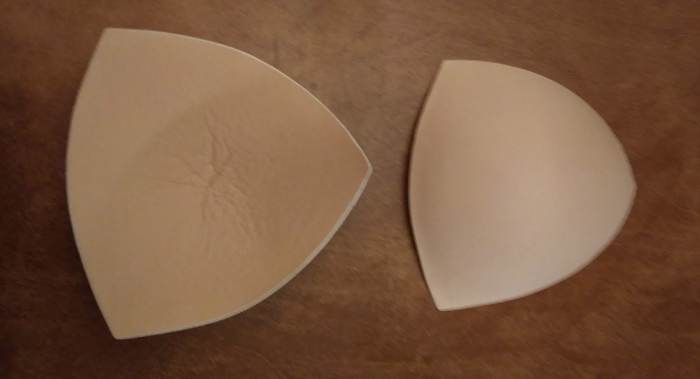
The thin foam inserts should remain inside the bra pockets. I've taken them out only so you can see them.
Catherine Giordano
Read More From Bellatory


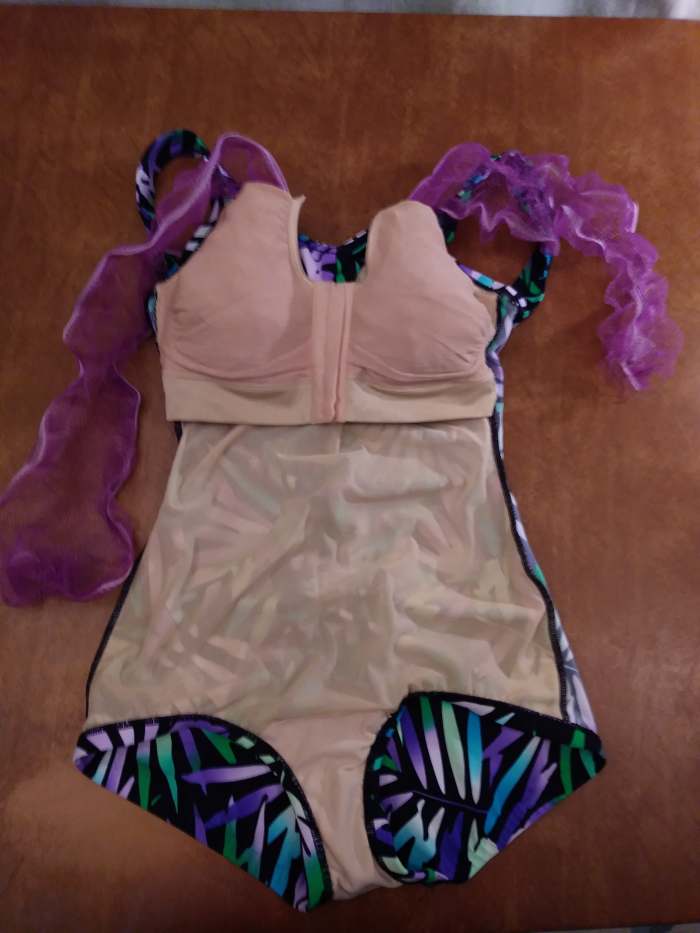
2. Turn the Swim Suit Inside Out
When you turn the swimsuit inside out, the molded cups will be exposed. The band just below the molded cups is the end of the shelf bra. Push the shelf bra cups so that they are concave.
Turn the swimsuit inside out to expose the shelf bra..
Catherine Giordano
3. Place the Comfort Bra Inside the Shelf Bra
- Lay the comfort bra over the shelf bra with the closure (the hooks and eyes) of the comfort bra facing down (towards the front of the suit.)
- Fold the extra fabric of the comfort bra under at the side seam so it won’t show when the side seams are stitched together.
- Pin the side seams of the comfort bra to the side seams of the shelf bra. The armhole of the comfort bra should lie along the armhole of the of the swimsuit. The center of the comfort bra should be below the center of the swimsuit. Don't worry about the straps. You’ll deal with that later.
Match the seams of the comfort bra and the swimsuit. Pin them together.
Catherine Giordano
4. Sew the Side Seams Together
- Sew the comfort bra to the side seams of the swimsuit using an overhand stitch. Use a piece of thread about 4 times longer than the seam. Double thread the needle by pulling the thread through the eye of the needle and then knotting the two ends together so that you are sewing with a double thickness of thread.
- When you sew, don’t let the needle go through to the front of the swimsuit—you don’t want the stitches to show on the front of the suit. You will only be sewing into the seam area. Start at the armhole and work your way down removing each of the pins when you are about an inch above the pin. Sew all the way to the way down to the bottom edge of the shelf bra. If the comfort bra is longer than the shelf bra, just let the extra part hang free.
- Cut the straps off above the pocket hole, but be sure to leave enough of the strap so it can be folded over later to close the pocket hole.
Note: If the straps of the comfort bra and the swimsuit straps match up, you can sew the bra strap onto the swimsuit straps for one or two inches.
Match us the side seams of the comfort bra and the swimsuit.
Catherine Giordano
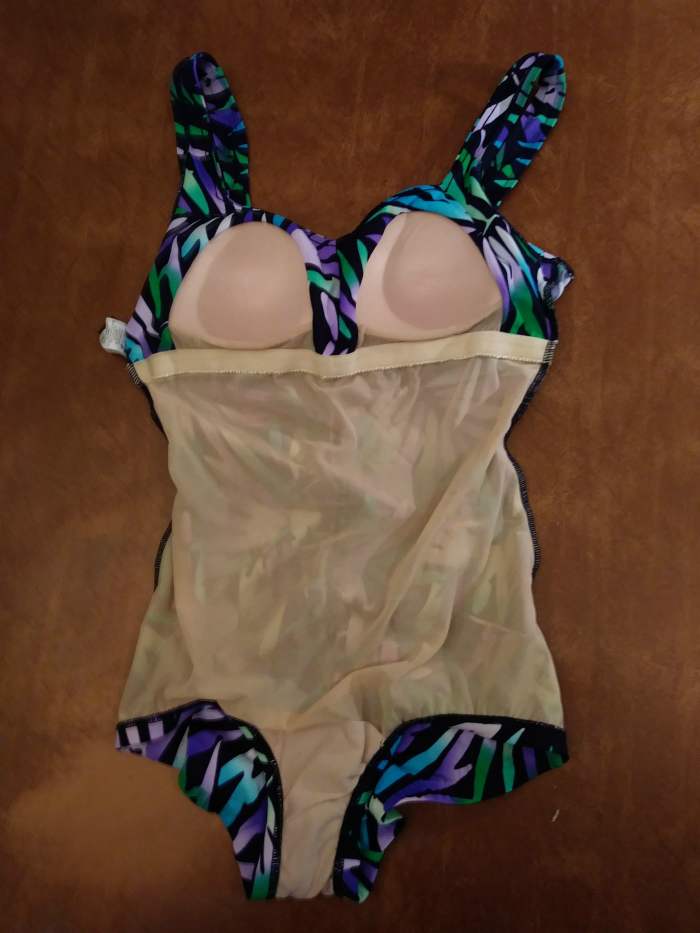
5. Tack the Center and Sew the Armhole Edges
Tack the center of the comfort bra to the center of the shelf bra where they meet. (Tack means to take a few stitches to hold the pieces in place.)
Punch the swimsuit cups of the shelf bra down and fit the cups of the comfort bra into them. Sew the outer edges of the swimsuit and comfort bra together along the armhole.
The armhold edge is sewn to the suit.
Catherine Giordano
6. Open Up the Shower Balls
Take one shower ball and cut off the rope in the center of the ball that is there to hang the ball. Dig your fingers into the center and find the cord that holds the ball together. Cut this cord and pull the ball apart. You will have a long wavy ribbon. Do the same with the second shower ball.
You can't use the ball as it is. I tried this and it looked very unnatural, like I had stuffed a tennis ball into my swimsuit.
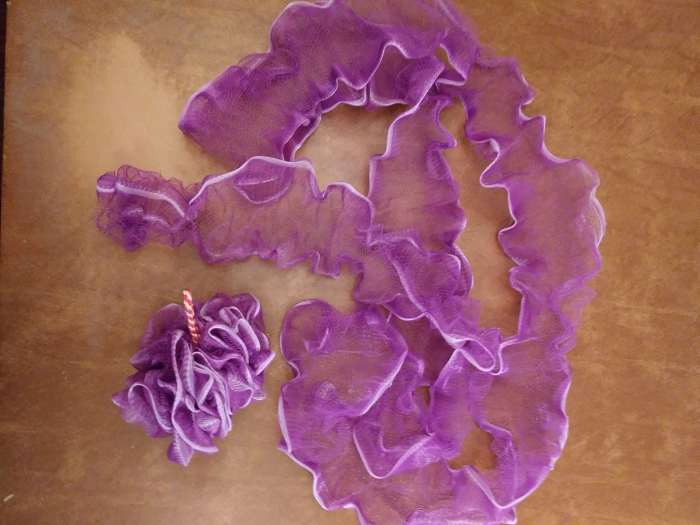
The shower balls, before and after the center cord is removed.
Catherine Giordano
7. Stuff the Ribbon Into the Pocket of the Comfort Bra
Insert the Ribbon
Insert one edge of the nylon mesh ribbon into the pocket opening at the top of the comfort bra. The foam insert should remain in the cup of the comfort bra and with the rounded side facing the front of the swimsuit. The ribbon is stuffed so that it rests against the side of the comfort bra that will be placed against your skin when you wear the swimsuit. As you stuff, arrange the ribbon to fit the shape of the bra. Make sure to put a little stuffing into the area near your armpit. Your real breasts extended into that area also.
Repeat on Both Sides
Keep stuffing until you have the amount of fullness that you want. You may not use all of the ribbon. Let the end of the ribbon hang free for now. Use a second shower ball for the other side. The swimsuit will look like the puffiness is on the wrong side (the inner side). However, when you wear the swimsuit, it will flatten out against your skin and all the fullness will be in the front where you want it.
Try the Swimsuit On
Try the bathing suit on. Remove some of the ribbon or add more until you have the look you want. Check to make sure everything fits and looks the way you want. Make any changes you feel are needed. Cut the excess ribbon if you have any or get more ribbon from another shower ball if you want more fullness. It won’t matter if it is not a one continuous ribbon.
Stuff the ribbon into the pocket of the comfort bra.
Catherine Giorano
8. Sew the Pocket Closed
When you are satisfied, the final step is to sew the edge of the pocket closed. You don’t want any ribbon falling out.
Fold the edge of the excess part of the strap into the opening of the pocket bra. Sew the strap of the comfort bra so that the pocket is sewn closed and the bra is sewn into the shelf bra. Continue stitching the top of the comfort bra to the top of the shelf bra along the line of the molded cup of the shelf bra. I didn't stitch all the way to the center, but I suppose you could if you feel it works better for your particular swimsuit.
Your swimsuit is now ready to wear. You might think that it would feel scratchy, but you won't feel anything but the smooth fabric of the comfort bra.
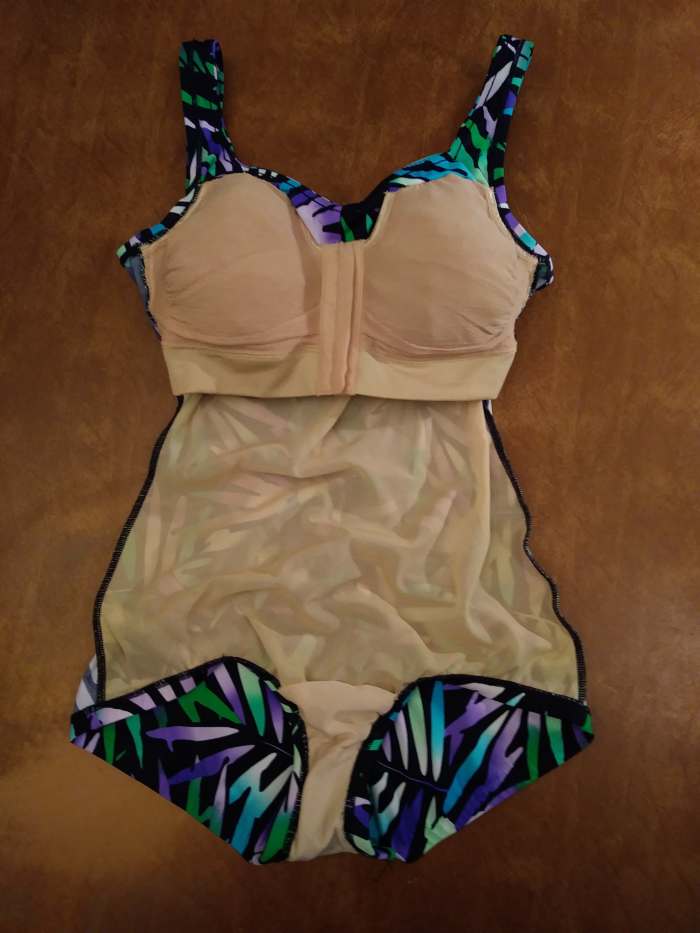
The pockets are sewn closed and the swimsuit is ready to wear.
Catherine Giordano
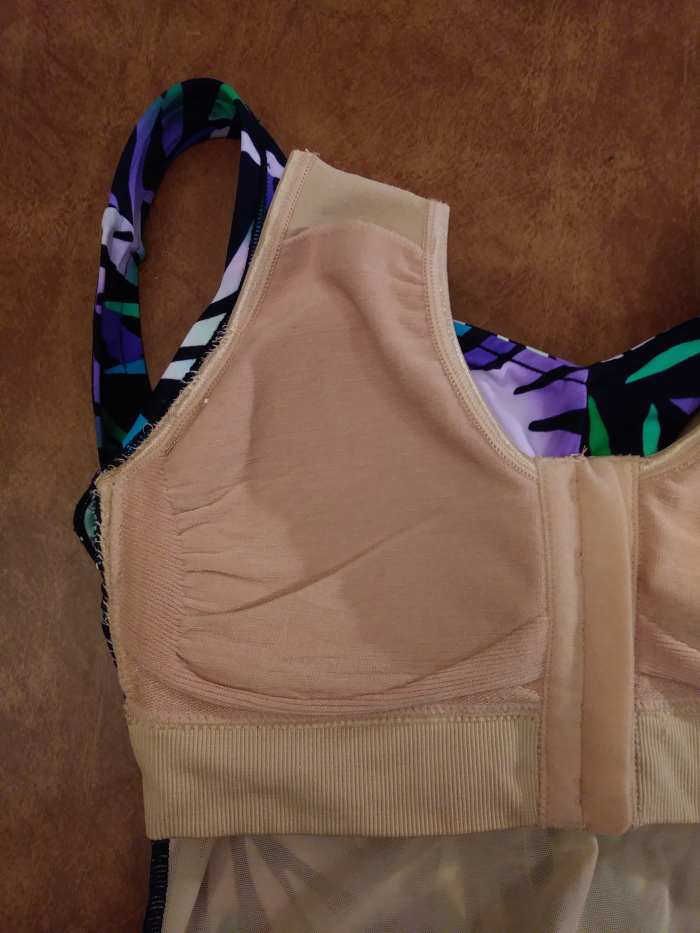
A Close Up View
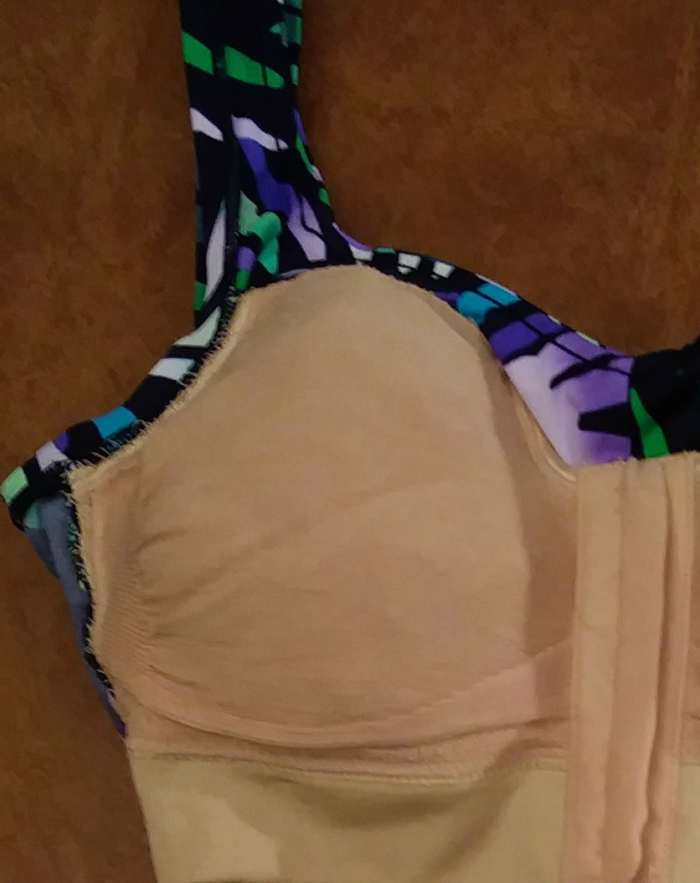
This close up view shows how the comfort bra was stitched to the swimsuit.
Catherine Giordano
The Final Test
Before I wore my swimsuit in public, I tested it in the shower to make sure it would look good wet. (If you have a backyard pool or lake, you could test it there.) Then I hung it to dry to make sure it would hold its shape. You might want to test yours to be sure everything will be fine.
I wore the swimsuit on my cruise. I tested it in the ship’s pool by doing an hour of water aerobics–jumping, walking, running, and twisting and stretching every which way. I even wore it in the hot tub. The swimsuit passed every test. It was wonderful to look the way I looked before I had the mastectomy.
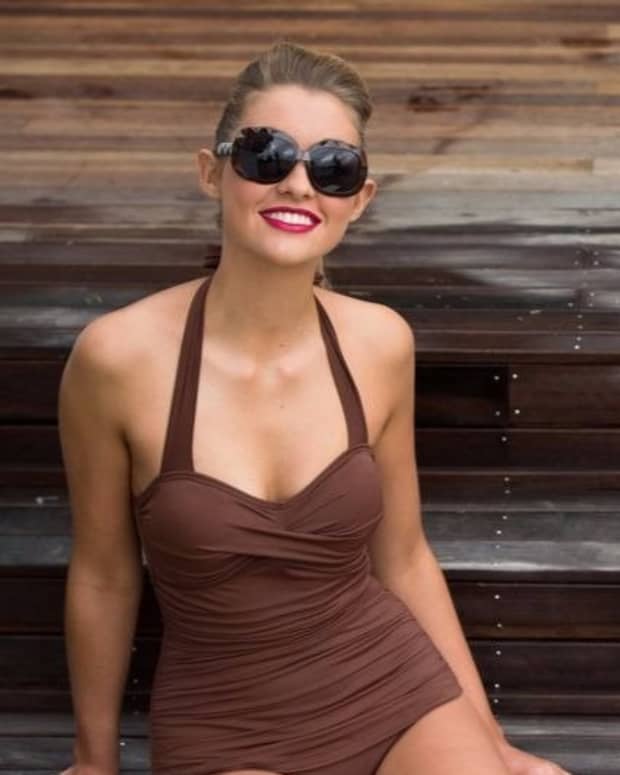
The Final Result

I now look like my former self.
Catherine Giordano
How to Care for Your Swimsuit
Care for your modified swimsuit just as you would any swimsuit:
- Rinse your swimsuit in cold water after each wearing.
- Gently wring out excess water.
- Hang it by the straps on a hanger. It will dry overnight.
How to Make a Post-Mastectomy Bra
You can use the comfort bra to make an everyday post-mastectomy bra. If you can’t afford the prosthetic bra and breast forms or if you find them too uncomfortable, this will make a fine substitute. I use mine for around the house or for my bike and gym workouts.
Just stuff the comfort bra with shower ball ribbon as you did for the swimsuit, leaving the insert in place with the rounded side facing the front of the bra to ensure a nice shape to the cups. When you have the look you want, sew the opening closed.
Viola! You now have a comfortable post-mastectomy bra with a convenient front closure. It’s very inexpensive and you can make it in 15 minutes.
I made this simple bra stuffed with ribbon from a shower ball for everyday wear.
What to Do If You Have a Single-Side Mastectomy
Women who have had their breast removed on one side only may not be able to use this idea. I'm told that you need to have the same amount of weight on both sides of the chest to maintain spine and shoulder alignment. (Prosthetic breast forms are weighted to mimic the weight of a real breast.)
You might be able to wear the modified swimsuit since the swimsuit is only worn for a short period of time. Consult with your doctor about this.
© 2018 Catherine Giordano
Please Leave a Comment and Share Your Experience
Cassandra on April 22, 2019:
Thank you for this wonderful idea..Wonder if this could be done with a bathing suit that has a built in Bra?
Helen on March 02, 2019:
Wow Catherine!.... Thank you so much for sharing! This has been a problem for me as I go swimming most days and have played around with various solutions which were not exactly successful, unless I went the expensive way. The bath net is a great idea! I had to rush off and try it in my swimmers immediately. I think this is going to be a winner!! I didn't have the bra but a polyfibre filled soft insert from my left side mastectomy in 2011. I have sewn the insert into my swimmers and filled it with the bath net. Just did a fashion parade for my hubby who is very impressed with the result. I am so confident with it I will give it a trial run at the pool tomorrow. I will also pass on your link to my breastie buddies at out next get together. Thank you so much Catherine. Cheers from Helen in Australia.
Catherine Giordano (author) from Orlando Florida on July 10, 2018:
Carol F: Please come back and share how it worked for you.
Carol F on July 10, 2018:
Thanks for the idea! I will be doing this soon, not yet cleared for swimming.
Catherine Giordano (author) from Orlando Florida on April 14, 2018:
Dianna Mendez: I'll be immodest and say I think I came up with a great solution. If you know anyone who needs this please send it on to them. Thanks so much for your comment.
Dianna Mendez on April 14, 2018:
This is such a nice article on an issue that many women experience. You have created a very lovely suit that solves a problem for others.
Catherine Giordano (author) from Orlando Florida on March 30, 2018:
Larry Raskin: Thanks for your comment. Perhaps there is a women in your family or among your circle of friends who might be interested in this idea.
Larry Rankin from Oklahoma on March 29, 2018:
Though I can't understand your situation on a firsthand level, I am inspired by your enginuity and resilience.
Catherine Giordano (author) from Orlando Florida on March 26, 2018:
Mary Wickerson: It sounds like you followed my driections to make your own suit and that it worked for you. I'm so glad to learn that others can have the same success with this idea that I did.
Mary Wickison from Brazil on March 26, 2018:
Your suit turned out great. I was a little worried when I saw the image of the bath net but it works.
So glad it passed the test on your cruise. Kudos to you.
Catherine Giordano (author) from Orlando Florida on March 25, 2018:
Doris James-MizBejabbers: I wish that everyone who had cancer had as easy a time of it as I did. I hope my bathing suit design helps others to accept what is necessary and then be creative as they move on in their life. Thanks for your kind words.
Doris James MizBejabbers from Beautiful South on March 24, 2018:
Catherine, you looked very nice in your swimsuit photo. I didn't know that you were a cancer survivor and I salute you and all other ladies who have survived this dreaded disease. Thank you for empowering them with encouraging words and easy to follow instructions.This is very ingenious and money-saving.
FlourishAnyway from USA on March 23, 2018:
I'm all for empowerment! You GO girl!
Catherine Giordano (author) from Orlando Florida on March 23, 2018:
FlourishAnyway: Thanks for your good wishes. I outed myself because I don't want to feel that I have to be ashamed about being flat-chested. I want to empower other women. By the end of the day, I hope to have posted another article explaining this in more detail.
Catherine Giordano (author) from Orlando Florida on March 23, 2018:
Sally Gulbrandsen: Thanks Sally. I'm happy with the decisions I made about having surgery without reconstruction. When I told my surgeon during a routine post-operative viit about this, she told me she wants to share this with her patients.
FlourishAnyway from USA on March 22, 2018:
I didn’t know you are a cancer survivor. I’m so glad that you came through this diagnosis, surgery and are healing. I’m impressed with the innovative solution here, particularly your step-by-step instructions. All the best to you, FlourishAnyway
Sally Gulbrandsen from Norfolk on March 22, 2018:
That is such a neat idea and so helpful for people who have chosen not to have implants after surgery. I will definitely be sharing this with a few ladies I know.