How to Mend Socks to Save Money
Liz's advice, on finance, credit, frugal living practices, & anything monetary, is from the 'school of hard knocks,' research, & experience.
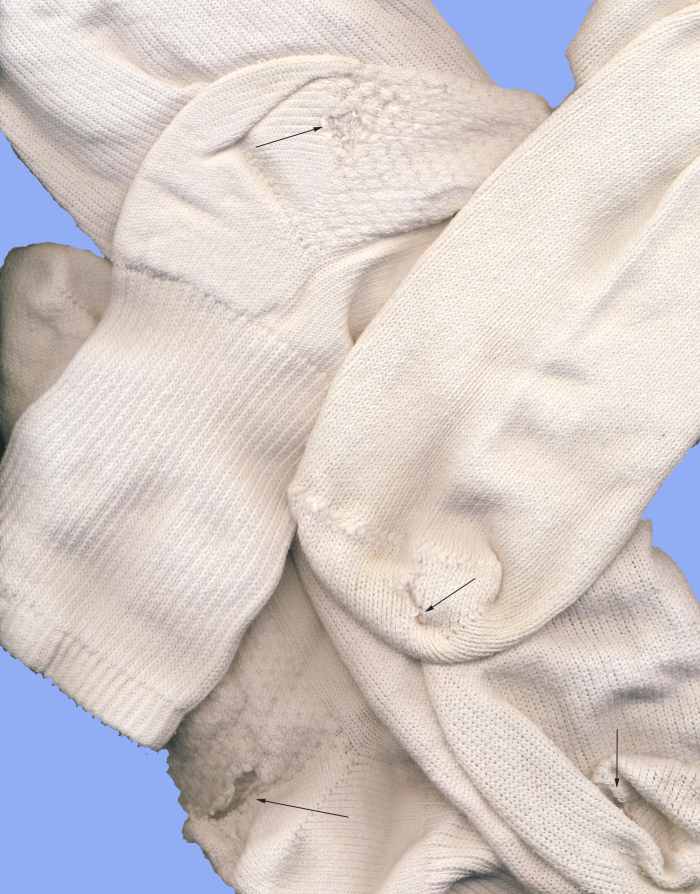
Are socks with holes really lost causes?
Why Should You Mend Socks?
Most of us are struggling to save a buck (or a few) wherever we can, and socks can be expensive! So why not make them last as long as you can?
There’s no need to toss out a pair or a single and end up with odd socks, just because of a little hole.
Most socks first develop holes either in the bottom of the heel or the toes—spots well-hidden inside your shoes—so no one will be the wiser that you’re wearing patched-up clothing.
That might be especially important if you’re trying to make a good impression, so you might as well spend the bucks on more visible items and mend the underwear and socks!
Unless, of course, you plan to be in an accident and then your mother’s advice about having clean underwear applies (although she never mentioned mended undies)! Of course, 'plan' and 'accident' are mutually exclusive terms!
Yankee Heritage
This is a life skill I learned while I was still quite young; certainly before my mid-teenage years. My mother was born and raised in Massachusetts; a true Yankee. My dad was born in New Hampshire, but the family came to California when he was still a young boy.
I grew up with the Yankee philosophy of being frugal and hearing and learning about all kinds of ways to save money by making ordinary household things last longer. Much of this advice pertained to clothing.
Both of my parents lived through the 10 years of the great depression from 1929 to 1939. I remember Mom telling that she and her brothers often had to cut out cardboard insoles to put in their shoes as a temporary fix for holes, as they could not afford to go to the shoemaker for repairs.
My mother's family was relatively lucky; her father was a bus driver, and so kept his job, as people who perhaps lost their cars to the financial meltdown, then had to ride the bus. All the same, times got rough.
My father was a young adult by this time; though he never spoke of that era much. Interestingly enough though, he too worked in public transportation, as a streetcar motorman during those years.
Darning: An Old Skill Revived
They used to call it darning socks. The practice goes back many, many years before my time.
Along with the cardboard shoe insoles, darned socks were a fact of life. Darn those socks!
It is really not at all complicated; it’s a simple skill that anyone can learn, including children old enough to handle a needle and scissors.
The Right Thread
First, you’ll need the right color thread to match your socks. Mended though they may be, unless you’re trying to be funny for a costume, you don’t want yellow darning on black socks.
We used to buy specially-made thread, called darning cotton, and it came in just four colors: white, black, gray and brown—because "in the olden days," those were the only colors of socks!
New Colors of Socks, New Threads!
I still have what’s left of the ball of white, but for other colors, I have found that embroidery floss works very well. You see, darning cotton is a multi-strand thread, and you separate the strands to use the material. There are four strands, but you only use two. This also makes your thread last twice as long.
If you are using embroidery floss, that is a 6-strand thread, your thread will last three times as long!
Comfort is another reason for using either of these types of thread, for they are softer than thread meant for machine sewing. They are also thicker, which means fewer passes with the weaving.
Read More From Bellatory


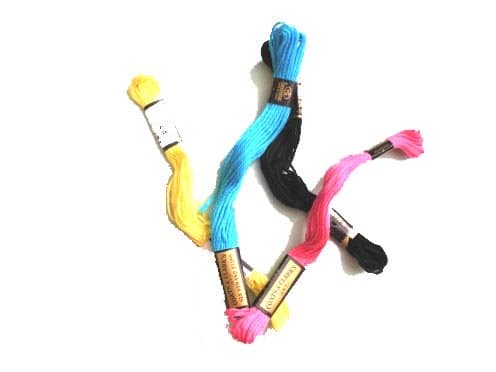
Embroidery Floss Comes in All Colors Imaginable
Use it up, wear it out, make it do, or do without."
— Yankee Saying
Note the Larger Eye

The larger eye also makes threading easier on those of us who can no longer see tiny things very well. (Appears larger than actual size in photo)
Tools You'll Need
- Darning Needle: You’ll need a medium-long needle with an eye large enough to thread two strands of thread. Remember, both old-fashioned darning cotton and embroidery floss are thicker than regular sewing thread for your sewing machine; that's why you need a needle with a larger eye to be able to use a double strand.
- Scissors: Keep a pair of scissors handy, and you’re good to go. If you prefer to use a thimble, that’s a good option, and you’ll see why later on.
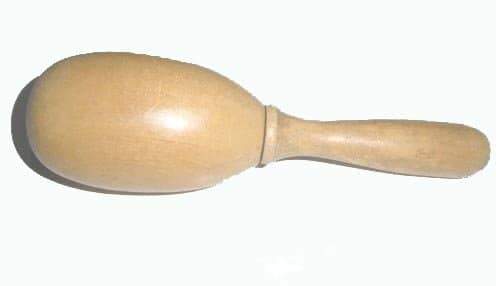
- Darning Egg: A what? No, not a real egg: a darning egg. It’s a specially-made wooden ball or egg-shaped piece of solid wood with a handle. This type is good for small to medium-sized socks. Sometimes, the shape is more like a drum, or filled-in embroidery hoop; these types also often have an actual hoop that fits over the sock to keep the material from sliding about or bunching up as you work, as that is important. This style is a great option for beginners. (See photos, below, for an example of both types.)
Two Types of Darning Eggs


Larger Mending: Sometimes Undies, Too
The drum type is also a good choice for larger socks, such as men's sizes. It is also a good choice for larger holes, although it is better to fix the holes before they become large. Alternately, it can be used for holes in knit undies, such as winter 'warmies' (aka, long johns), or some kinds of panties.
Both types of darning eggs have handles, usually detachable. You don't really hold it by the handle as you work, though, as you need to keep your hand around the work area to keep the material pulled tautly.
The handle itself used to be used for inserting into the fingers of gloves to mend those. But since not many folks wear gloves anymore, that has rather gone by the wayside. However, the handle end can be useful for tiny socks, such as baby and toddler sizes.
Don't Have a Darning Egg?
If you don’t have a darning egg, you can substitute some other items.
- a smooth, egg-sized rock,
- the handle end of a flashlight,
- a larger pill bottle, such as a round vitamin bottle,
- a billiard ball,
- or anything along those lines.
If you like this money-saving tutorial, it might be worth your while to hunt through second-hand or antique shops for a real darning egg.
Warning! Do Not Use a Lightbulb
One darning-egg substitute I have seen suggested, I absolutely do not recommend, is a light bulb!
You do need to hold a fair amount of firm pressure to keep the sock from sliding about as you work, and it would be too easy to squeeze a bit too hard, break the light bulb, and cut your hand.
Begin the Process
For probably obvious reasons, you want to darn the sock after it has been washed.
Start by turning the sock inside-out. Insert the darning egg so that it rests right under the hole, and stretch the sock tight over the egg.
Thread your needle with a double-strand of your chosen thread color, anywhere from about 12 to 18 inches long (depending on how large the hole), and pull it through to not quite doubled over. Leave the end loose; do not tie a knot. That would make a very uncomfortable and sharp-feeling lump under your foot!
You want the trailing end to follow your work, but you don’t want to use 4 strands—keep the trailing end just long enough so it won’t pull out of the needle.
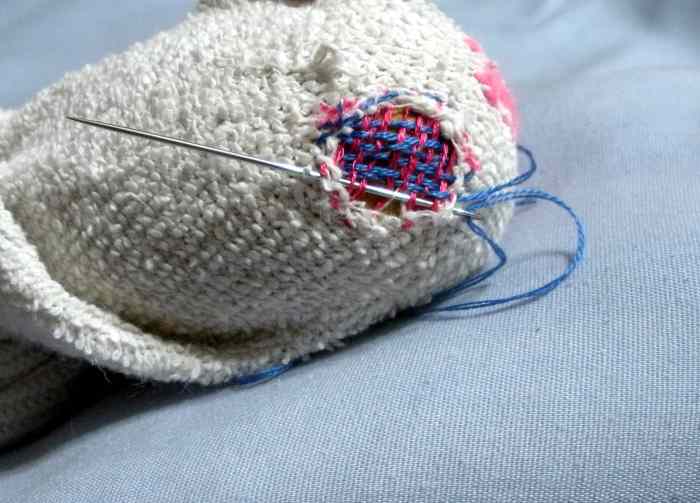
Now, beginning at one edge of the hole, work the needle in and out of the existing material along one edge, and take a stitch or two over the top to anchor the thread without a knot. As you work, be sure and keep the sock pulled taut over the darning egg.
Note: For the photos below, I've deliberately used a sharply contrasting thread, to show the process better. I've also worked the weaving a little looser than normal, for clarity.
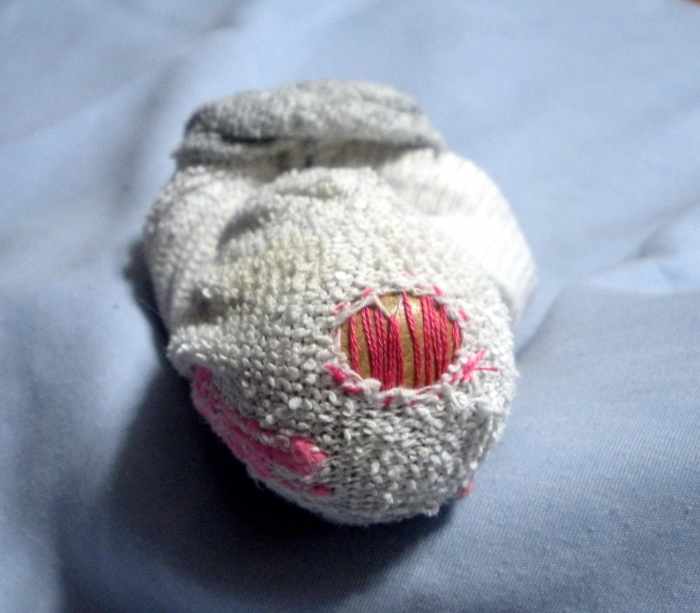
First Stage
Next, begin working back and forth, catching the sock material at the edge of the hole, turning the work 180 degrees around and catching the other edge, back and forth, until you have created a series of parallel threads bridging the hole.
(If you prefer, and it is easier for you than continually turning your work, you can simply change hands with the needle as you go back and forth. For me, that's awkward, as I'm not ambidextrous.)
Second Stage
Next, turn the work 90 degrees, and begin weaving in and out of the threads you just laid down, under/over/under/over and so on, until you reach the opposite side.
As before, catch the edge of the material, turn the work 180 degrees, and work back to the other side the same way, only going opposite under-and-over stitches.. Where you went under on the last pass, go over, and so forth. (Again, if you prefer, you can just change hands back and forth with the needle instead of rotating the work itself.)
As you work, you will count the double-strand of thread as a single as you do the weaving, working over and under both strands together, not going between them. This makes the mend stronger. Repeat this process until you’ve filled in the hole.
Keep the lines of weaving as close together as you can manage. (For larger holes, or heavier socks, I will sometimes add a third pass going on the diagonal, but that is not mandatory.)
If you make a mistake, and go under or over two in a row, it's not that big of a deal; sometimes it happens.
Worked a little looser than normal for photo clarity.
Finishing Off
Finish off by once again taking a couple of stitches on top of each other into the original sock material, and snip off close to the work. Voila! You’ve just darned a sock!
For added comfort, to soften the mend and help it blend better into the feel of the original material, you can hammer the mended area all over, and especially at the edges where the darn meets the sock, using either your thimble or the handle of the scissors.
Remove the darning egg (or whatever substitute you've used), turn the sock right side out, and you're done!
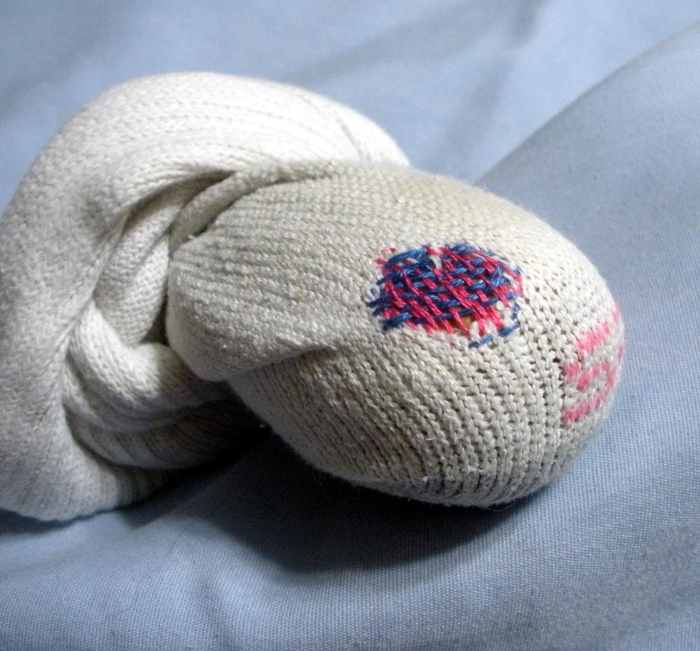
Finished on the inside: this is where you want to 'hammer down' any lumpiness.
Turn it Right-Side-Out, and You're All Done!
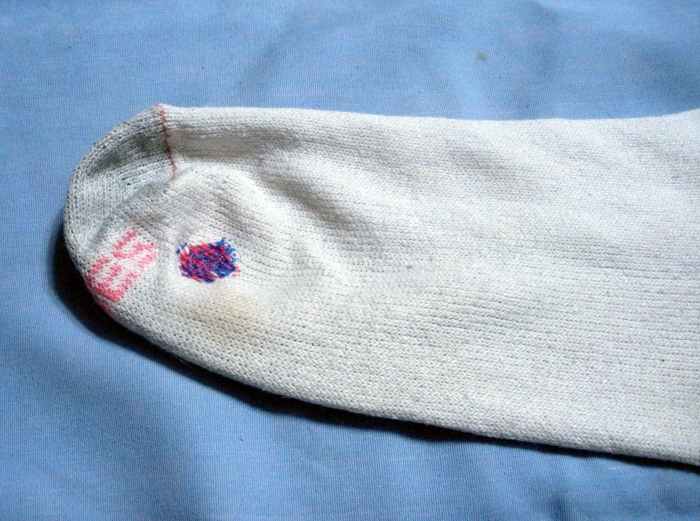
Voila! One sock rescued for more years of service.
© 2018 Liz Elias
Comments
Liz Elias (author) from Oakley, CA on June 26, 2018:
Hi Peg,
Thanks, I'm glad you found this to be useful and doable. Good luck with trying your hand at this skill. It really isn't difficult; just takes some patience.
Peg Cole from North Dallas, Texas on June 25, 2018:
Loved this great tutorial on darning socks. I've done some patching on clothes and mending but not on socks. Your photos and explanation are easy to follow and quite doable.
Liz Elias (author) from Oakley, CA on June 19, 2018:
Hi Sherry!
Thanks for stopping by. I know--the elastic goes a lot of the time--and usually to your otherwise most comfy socks!
Danged cheaply made low-quality imports!
Sherry Hewins from Sierra Foothills, CA on June 18, 2018:
I have sometimes repaired a sock, but usually it seems to be the elastic that wears out first.
Liz Elias (author) from Oakley, CA on June 18, 2018:
Thanks very much! I do believe it is necessary to conserve when and where we can. I still mend clothing, although I admit it's not a much-loved task, and tends to accumulate until the stack is unwieldy! LOL
But, I did just get my sewing machine repaired and tuned up, so no more excuses for me! ;-)
C E Clark from North Texas on June 18, 2018:
As I was perusing your articles, this one caught my eye right away. It brings back memories of my mother darning our family's socks at least one day a week. There were 7 of us including my parents and that meant a lot of socks to be mended. She also patched shirts for my father and brothers whose elbows often wore through the sleeves after a while. When a shirt was no longer worth patching she made handkerchiefs out of it -- Kleenex hadn't made its debut yet
Seems like everything in our society is disposable these days. I think this is a wonderful article that can not only save money, but also space in the landfills across this country if people will just follow your directions.
Suzie from Carson City on May 26, 2018:
Dizzy,,,,,,I admit to being a dinosaur in numerous ways. I just realized one day, that knocking myself out to "keep up with the times," (so-to-speak)....is not one of life's necessities. I always seem to go back to one of my Dad's favorite, common sense remarks: "If it ain't broke, don't fix it." I translate that into the things we do also. I'm a creature of tradition and ceremony. I'm guessing you are as well. Some may mistakenly think we're "weird".....don't believe it, Dizzy.....we are "UNIQUE!" Have a peaceful Holiday week-end! Paula
Liz Elias (author) from Oakley, CA on May 25, 2018:
Thanks Paula!
I know there are a few of us "dinosaurs" still lurking in the shadows of frugality! ;-)
I, too, try to mend as many things as I can, but I confess as I get older, it takes me longer and longer to just get around to doing it. LOL
Recently, I "salvaged" a couple of T-shirts that had huge holes in the underarm seams, and ripped partly into the fabric. Rather than try to pull it all together, I simply cut the sleeves off, along the outside of the original seam line, and, presto! 2 "new" sleeveless shirts! HA!
Thanks again for stopping by and your input.
Suzie from Carson City on May 25, 2018:
Dizzy.....Great Instructions for a very useful project. Our Mom darned socks, just as she patched, hemmed, stitched up & somehow repaired any item of clothing. It was par for the course that my sister and I learned how to do it all.
With the reputation I have as a penny-pincher and all around frugal lady, I still darn socks. Of course, I only darn the really expensive socks that I feel are worth my time. When I buy a pack of 6 pair for 8 bucks for my grandkids, those are definitely the throw away kind!
I'll bet a lot of people will appreciate this article.!
Liz Elias (author) from Oakley, CA on April 16, 2018:
Hi Shauna!
The tools I have were handed down in the family; the darning eggs I pictured were my mom's. They may have come down from her mom before her.
I'm glad you enjoyed the article; it isn't difficult, and doesn't take all that long to do, especially if the hole is still small. Thanks for chiming in.
Shauna L Bowling from Central Florida on April 16, 2018:
This is quite interesting, Liz. I don't wear socks very often, living in Florida, so I rarely wear them out. My son, on the other hand, wears socks every day, most of which have holes in them! I just throw them away. If I had the patience, I might think about darning them, but probably not.
I had no idea there are actually tools out there just for darning socks!
Doris James MizBejabbers from Beautiful South on April 14, 2018:
Now that is real Yankee ingenuity! I've worn many a repaired sock when I was a kid, and my mom taught me to sew them myself. I have narrow feet and my shoes rubbed up and down on my heels which resulted in lots of holes. Mom called it "darning" but we didn't weave the sock like that. First, we were so poor that we couldn't blow money on a darning egg, so we used the forbidden light bulb. We cut a patch from a similar sock that was deemed unrepairable, turned the sock wrong side out and inserted the patch and pinned it on. Then we removed the sock, turned it right side out, slid it back onto the bulb and stitched the patch around the hole. Then we cut off the excess fabric from the underside. The result was a little circle on the heel of the sock that sometimes showed and sometimes it didn't.
After wearing so many patched socks in my lifetime, I say "thanks" but I'll just blow money on some new ones. LOL I really enjoyed reading about your method though.
Eric Dierker from Spring Valley, CA. U.S.A. on April 14, 2018:
My much younger wife and son did not believe me about cardboard shoe hole repair and mending socks. So I mended two pair and did not tell them for two weeks. I normally do not do it but love the concept for our ecology concept of use and reuse before recycling.
Larry W Fish from Raleigh on April 14, 2018:
I usually wear my socks with holes in them until they cover half my foot. Then my wife yells at me to buy new ones, hahaha.
Mary Wickison from Brazil on April 14, 2018:
I mend a lot of our clothes but socks I usually throw away. I will definitely try this method to resurrect them. I like the idea of using embroidery thread, that wouldn't have occurred to me.
Thanks for the useful article.
Bill Holland from Olympia, WA on April 14, 2018:
I have a confession to make: I am almost seventy years old and I have never mended an article of clothing....no clue how to use a needle and thread...so I read this with some interest. :)